How to Make an Ashcan Comic
Download this tutorial: DOWNLOAD ![]()
This is a small tutorial on how to make a simple but good-looking “ashcan” comic for self-printing or taking to a printing service.
Preparation Before Going to Print:
This is one of the most important things to do in making an Ashcan Comic. The following are things to prepare for before going to print:
1) DPI/Resolution
dpi = Dots Per Inch
In Adobe Photoshop it’s the Resolution that controls the dpi quality.
 If you’re printing from a computer (either drawn from Photoshop or pages prepared in some other art program) it’s very important to pay attention to the DPI (Resolution in Adobe Photoshop). If the resolution is too slow, then the print quality will be blurry or pixilated. You want to make your comic readable and clear.
72-96 dpi is today’s standard for web, it looks great for the web, but terrible for print. The following sizes are decent or best for print:
150 dpi: minimum resolution for print. It will look decent and make the file size small, but the quality is not optimal.
300 dpi: common resolution that creates a good print result.
400+ dpi: creates a more high quality print, the kind you might find in an issue of National Geographic. Though a lot of printers can’t print at this quality and revert to a maximum of 300 dpi (for ashcans you really shouldn’t need any more than that).
Your DPI settings should be determined first. DO NOT alter the resolution from 72 to 300 after the image has been added or the image quality will pixelate/blur). Be sure that the resolution is set to 150+ before you add art to Photoshop or another art program.
Note: You can find the Resolution in Adobe Photoshop by going to Image>Image Size and looking for the Resolution setting, as shown in the image above.
2) Know the Size of the Comic
A common ashcan comic size is taking an 8.5×11 piece of paper and folding it after printing (so technically you’re turning the paper on its side and doing side-by-side 5.5” wide x 8.5” tall images). You can do other sizes as well, but you’ll need to keep in mind how to format the artwork properly and whether your personal printer or print service can handle it. For this tutorial I will be using 8.5×11 inch paper as the main example to work from, although I will try to explain enough to help people who want to fit different sizes. Just know what size you want before you start drawing, because trying to stretch or shrink things later can be… problematic.

3) Bleed
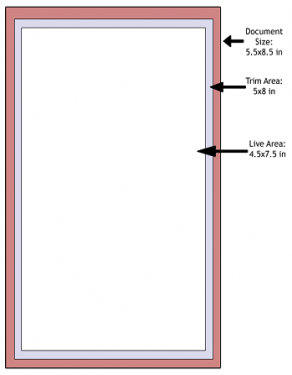
After folding the comic you (or your chosen print service) will have to cut the comic to make all the pages even with one another and make the comic look as clean and professional as possible. Because of this, you will have to prepare for a trim/bleed area.
The bleed area will be cut off and so it is important that you are careful that you don’t place necessary artwork or text in that location. So know where you will be cutting all the comics from the edges, normally I cut about 0.25 – 0.5 inches from the edge. Print services should have templates or instructions for you on this.
If you want to have artwork that goes cleanly to the edge of the page (no white space), then going into the bleed area is appropriate.
4) Text Safe Area
About 0.5 inches into the page is usually where the text safe area is located. The Text Safe Area is very important because this is where the text is safe from being cut. Also text too close to the edge tends to look a little odd/uncomfortable to readers and amateurish in presentation. So adding 0.25 inches from the cut edge (0.5 inches from the paper’s edge) helps correct these problems.
5) Layout the pages
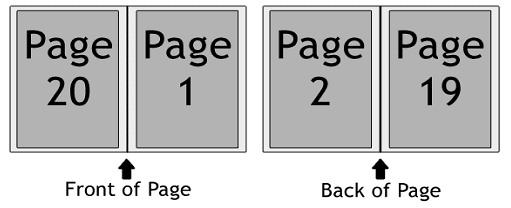
Know how you’re going to layout the pages. The easiest and simplest method is to print out each page individually and then figure out the layout by taping them together or otherwise loosely arranging them. It can be tricky when you’re doing it yourself because you have to remember that every page of paper coming from your printer is going to need to have four separate pages of your comic on it, and they’ll need to be in order once gathered into a booklet and folded. It’s not intuitive to the average person so this step of physically arranging things before committing to your print run is very important. Printing page 1 and 2 on the front and page 3 and 4 on the back of your first sheet is a complete mistake. You have to think about this like how a comic book is put together, and in a comic book the arrangement is more like this:

For instance, if you have a comic consisting of 20 pages (usually cover pages aren’t counted but for demonstration purposes we’ll ignore that) this first sheet of paper would consist of your Back Cover, Front Cover, Inside Front Cover, and Inside Back Cover. Because of this it’s even possible one or more halves might be left blank.
Preparing for a booklet format is arguably the most complicated part of doing the printing yourself, but easy enough with some patience, floor space, and hopefully a sleeping or absent pet. Once you’ve got it all straight, it’s a simple matter of putting the proper images together in your imaging software, and the end result will look infinitely better than something you just staple straight on like you would with a book report.
As a note, yes, this does make 2-page spreads tricky to pull off, since only in the very middle of your comic (and the outside cover) will a single sheet of paper contain both halves of an image. Your bleed and binding will have to be very exact anywhere else.
If you have someone else print the pages, then go by their methods of laying out the pages. Sometimes the print shop will want you to simply supply the pages in sequential files as 1, 2, 3, etc.… in a PDF, or .TIFF format. Be sure to ask them if you go this route, since every service has different protocols.
Printing:
To people unfamiliar with making comics, this sounds like the most intimidating part, but at this point in the tutorial you might be finding it less intimidating than the preparation! If you’re using a print service you don’t even have to worry about it, but otherwise, fear not, with a halfway decent printer (we use a color inkjet that cost us less than $200) and some easily available office supplies you should be good to go.
1) Print
When self-printing, you want to be sure you:
a. Have enough ink – nothing worse than running out of ink in the middle of the night.
b. Know how your printer feeds — do you need to flip the page to be sure page 1 is connected with page 2? Double-sided printing often means feeding your sheets through twice, so be sure you know how your particular printer works with that.
c. Decent quality of paper – You probably don’t want to buy paper that is too thin or the image will bleed to both sides of the page. You want people reading one side of the page without seeing the comic behind it. On the other hand, thicker paper is often more expensive and prone to jams or feeder problems. Find a good compromise.
After printing you might want to let the pages dry before handling them, that way you don’t accidentally smudge the pages when you’re folding or handling them. Full-color images on both sides of a page means a lot of ink! I usually let them sit for about 24 hours to dry.
I would also highly suggest doing a single print “proof” for yourself first so you can make absolutely sure everything is arranged correctly. You may want to go as far as following the rest of the steps here just to be certain it reads how you want.
2) Scoring the Paper
Scoring is a simple little step that helps move the fibers in the paper so that the pages fold in half better. You’re not cutting! Just making a groove. You’ll need the following:
a. Ruler
b. Scoring tool – there are many tools to help do this, some are special boards or made of bone. But all you need is a dull thin tool like the dull side of a butter knife or a letter opener. The only important thing is to not use anything that has paint on it or might stain the paper (like a cheap blue pen cap that can smear blue on the paper)
How do you score the paper? It’s very simple:
a. Find the center of the paper
b. Place the ruler on the paper
c. Run your score tool along the paper with the ruler to separate the fibers of the paper.
d. Fold paper
3) Put the Pages in Order
This is hopefully where you find out all that prep layout work you did was correct.
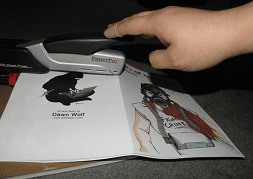
You can use a standard stapler, but you’ll have to fold the paper in order to reach the center fold. If you’re making a whole bunch of ashcans, it might be beneficial to buy a long stapler. A long stapler will also help make things go faster and more accurately because you won’t be fighting to fold the paper. They can be bought at places like Office Depot.
5) Cut / Trim
 You want to cut the book after it’s stapled and folded so that all the pages edges are even. I suggest getting a “paper trimmer” so that it’s a clean straight line (as you see in the image, the trimmer doesn’t have to be fancy). You’ll want to cut along the trim area you previously determined (which for this example is 0.25 inches) on the top, bottom and right side.
Do not cut when the booklet is open because the pages will be uneven when the booklet is folded. Fold as a booklet and then cut all the pages together to make the final result look professional and clean.
And you’re done! Congrats, you have an ashcan comic!

You must be logged in to post a comment.